
![]()
Camera properties in PowerApp
How to Insert a camera in PowerApps Screen
>click on + insert-> select media->select camera

Now thus camera would get into the application screen
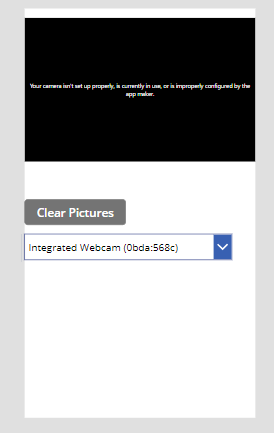
when the camera is added, it connects to the local camera of the desktop or the Inbuilt camera of the laptop

Camera property
>If a device have a multiple cameras, user can switch to the required camera options accordingly
For to select the option we use the dropdown from the +insert tab
cameraname.AvailableDevices
It will show the available devices of camera, as the function would shows a table format with the Id’s and the asset name are currently in action
[If you have a external cameras connected to the laptop/desktop it will display in the items]
Stream Key property
Stream has the ability to take the pictures automatically in the defined time.
>Select the camera
>Go to Advanced
>search for streamrate
>provide the stream rate(e.g 10000) which is 10 secs, so the camera grabs the picture for every 10 seconds

>Search for the Onstream property
>provide the collect fn.
collect(cameraname, self.stream)To display the pictures in a gallery
>create a required gallery from the +insert tab
>select the gallery
>In item property provide the collection created earlier.