
![]()
List settings in share point online :-
- List Name, Description & Navigation
- Versioning settings
- Advanced settings
- Validations settings
- Delete list
- View settings
lets create a list in share point online.
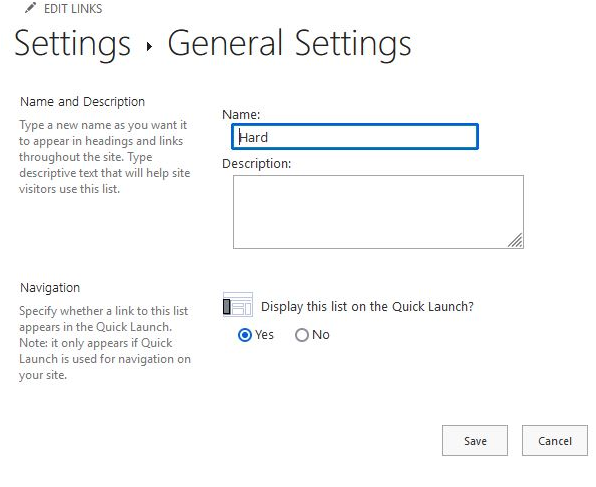
Here I am using a SharePoint list “Hard ” where we are going to check the list settings in detail.

open the SharePoint site -> “Hard” list -> site action gear. Here we can see list settings option as shown below.

In the list settings the view will display like this as shown below where we can see different settings in a list.

- List name , description and navigation :- Here we can change the name of the list and we can add description & we can set navigation to access the list quickly.
2. Versioning settings :- Versioning is the method by which a new changes of a document are numbered and saved.
Document library will have major and minor versions . List will have only major versions.
Versioning is enabled by default in Share point Libraries and is disabled by default in lists.
Ste

To check the versioning history 1st we need to select an item for which we need to see the changes made. Then select an eclipse of an item and go to versioning settings where we can see different history changes when an item is edited

Here we can see two version histories where I have changed the record two times.
We can view , restore and delete the changes by selecting a versioning history

3. Advanced settings :-
Content types :- The content types are reusable type definitions which we use inside a list or document library . We can create a required content type which includes a site column and can be reusable in any list or library or we can add from an existing content type.. We can change new button order and default content types.
Item level permissions :- In this setting we can give permissions on a specific item to read
create or edit in a different ways as shown below

Attachments :- we can enable or disable attachments to a list or library to insert any files from our computer
Comments :- Comments can be enabled or disabled to a list or library on which you are going to create .
Folders :- You can add new folders to a list when you enable this setting
Search :- searching of our list is felicitated when we have enabled this setting to search our list when we have huge lists

Index Non-default views :- This will specify whether non-default views of this list should be indeed.
Offline client availability : – This will specify whether the list should be available for offline client.
Quick property editing :- This will specify whether quick edit and details pane can be used on this list to bulk edit data.
Dialogs :- Dialogs will be available to specify whether to launch the new ,edit and display forms in a dialog.

Automatic index management :- Automatic index management allows share point to maintain column indices on this list to provide the best query.
List experience :- Here we can display the list using a new or classic experience . We can also view the list in default experience for the site.

4. Validation setting :– Validation setting will be used to specify the formula you want to use to validate data when new items are saved to this list.
If validation expression fails then the user messages will be shown as indication.

5. Delete setting :– Deleting a list directly is enabled by this setting. It will restore in recycle bin for 90 days .

6. View settings :- View settings will help us to change the view of a list in different modes depends on our requirement.
When we check on the top right navigation the default view of a list is “all items ” view. If you need to change the view in list mode, compact list mode and gallery mode you can refer these views as shown below.

Where we can also change the list settings in “List settings” option
when we create a list it will save as in “all items view” by default. You can change the all items view by selecting all items view and can change view name and order of the columns etc.
We can also create a new list view be selecting “create view ” option as shown below

ALL ITEMS VIEW :-Here we can see the all items view
Name :- you can give a specific name to your view by using this option. We can also add web address to our list. This view appears by default when visitors follow a link to this list.
Columns :- we can reorder the columns order or we can select which item has to be displayed and which item has to be hided.

Sort :- sort option will be helpful in sorting our columns based on ascending or descending order of letters or numbers.
Filter :- we can also add filter function on our list columns by adding a different set of conditions .

Filter column :-
Here I have filtered the title column with Microsoft as shown below


Tabular view :- Here we can choose whether individual check boxes for each row should be provided. These check boxes allow users to select multiple list items to perform bulk operations.
Group by :- we can perform group by action by selecting up to two columns in a group or sub group modes.
Totals :- here we can add the total count of a particular column items at the bottom of a column.
Style :- you can add different styles here.
Folders :-Here you can see items with the folders or without the folders.
Item limit :- item limit can be enabled here when you need to display a particular count of items.
Mobile :- we can enable this view for a mobile access

Create view :- we can create a view in 4 different views as shown below
1. Standard view :- This view is nothing but a default view
2. Datasheet view :- Datasheet view is an editable spreadsheet view which is better for bulk editing and quick customization
3.Calendar view :- we can see the data in a daily ,weekly or monthly calendar.
4. Gantt view :- list items can be seen in a graphical representation by using Gantt view.
