Using BACPAC Files for SQL Server Migration: A Comprehensive Guide
Migrating databases from on-premises SQL Server environments to cloud platforms like Azure SQL Database or Azure SQL Managed Instance is a common practice for organizations seeking scalability, security, and reduced infrastructure management. One of the most effective methods for such migrations is utilizing BACPAC files. This guide provides a detailed, step-by-step process for exporting and importing databases using BACPAC files, ensuring a seamless transition to the cloud.
1. Understanding BACPAC Files
A BACPAC file is a ZIP file with a .bacpac extension containing the database schema and data. It is used to export and import SQL Server databases to and from Azure SQL Database or Azure SQL Managed Instance. Unlike traditional backups, BACPAC files are designed for portability and are ideal for migrations.
Key Characteristics:
- Schema and Data: Contains both the database schema (tables, views, procedures) and data.
- Portability: Facilitates easy transfer between on-premises SQL Server and Azure environments.
- Not a Backup: Unlike traditional backups, BACPAC files do not include transaction logs and may not guarantee transactional consistency.
2. Prerequisites for Using BACPAC Files
Before initiating the export and import processes, ensure the following prerequisites are met:
- Azure Subscription: An active Azure subscription with permissions to create resources.
- Azure Storage Account: A storage account in the same region as your target Azure SQL Database.
- SQL Server Management Studio (SSMS): Installed on your local machine to interact with SQL Server.
- Sufficient Resources: Adequate CPU and memory resources on the machine performing the export to handle the operation efficiently.
3. Exporting a Database to a BACPAC File
To export a database from an on-premises SQL Server to a BACPAC file:
- Prepare the Database:
- Ensure the database is in a consistent state. It is recommended to set the database to READ_ONLY mode to prevent any changes during the export process.
- Remove any unnecessary data or objects to reduce the size of the BACPAC file.
- Launch SSMS:
- Open SQL Server Management Studio and connect to the source SQL Server instance.
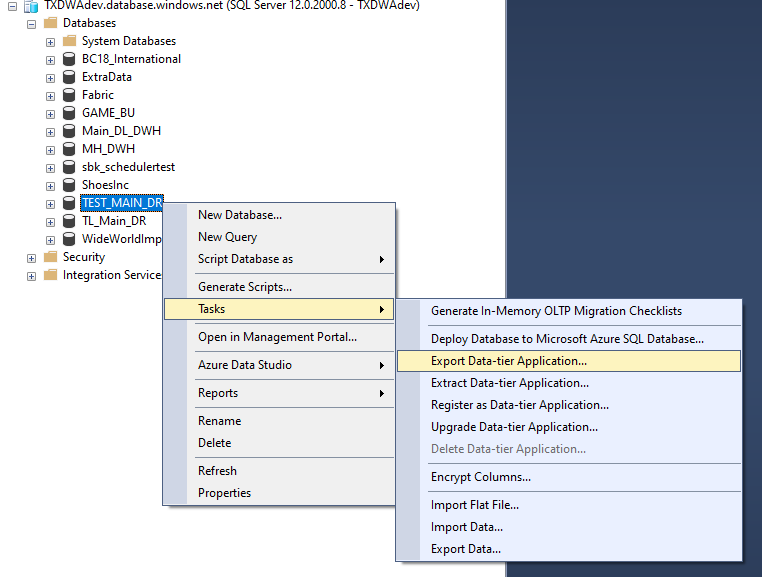
- Export the Database:
- Right-click on the database you wish to export.
- Navigate to Tasks > Export Data-tier Application.
- Follow the wizard to specify the export settings:
- Export to Azure: Choose to export the BACPAC file to an Azure Storage Account.
- Export to Local Disk: Alternatively, export the BACPAC file to a local disk.
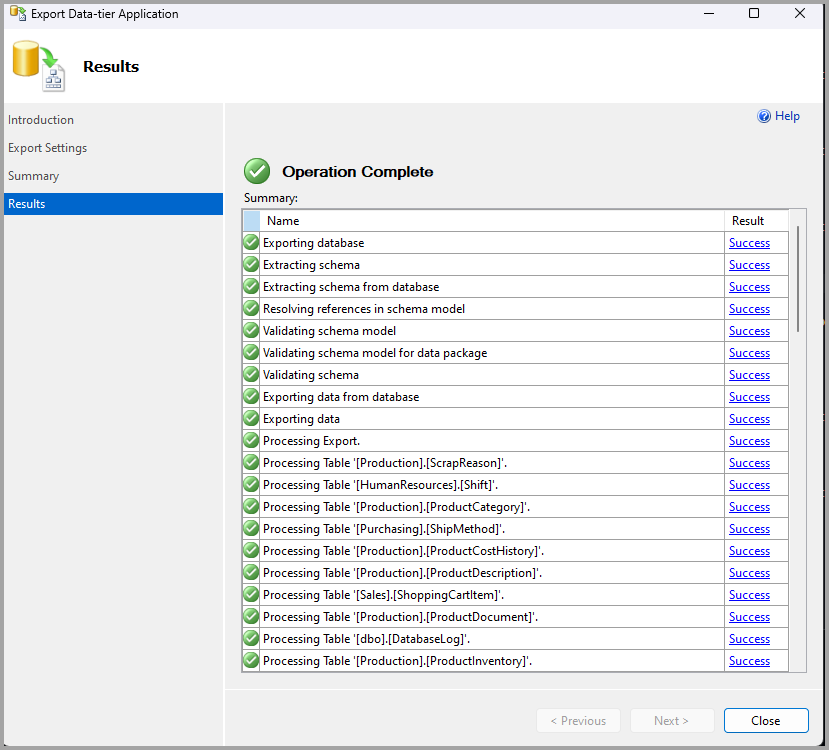
- Monitor the Export Process:
- Monitor the progress of the export operation. The time taken will depend on the size of the database and the performance of the source server.
- Verify the BACPAC File:
- Once the export is complete, verify the existence and integrity of the BACPAC file in the specified location.
Note: The export process does not guarantee transactional consistency. To ensure consistency, perform the export during a maintenance window or when the database is not under heavy load.
4. Importing a BACPAC File into Azure SQL Database
To import a BACPAC file into Azure SQL Database:
- Prepare the Azure Environment:
- Ensure you have an Azure SQL Database server set up in the desired region.
- Create a Logical Server in the Azure portal if not already available.
- Upload the BACPAC File:
- If the BACPAC file is on your local machine, upload it to an Azure Blob Storage container within the same region as your Azure SQL Database server.
- Initiate the Import:
- In the Azure portal, navigate to your SQL Database server.
- Under Settings, select Import.
- Provide the necessary details:
- BACPAC File URL: The URL of the BACPAC file in Azure Blob Storage.
- Database Name: The name of the new database to be created.
- Authentication Details: Server admin login and password.
- Monitor the Import Process:
- The import process will create a new database in your Azure SQL Database server. Monitor the progress through the Azure portal.
- Verify the Imported Database:
- Once the import is complete, connect to the new database using SSMS or Azure Data Studio to verify its integrity and functionality.
Note: The import process creates a new database. If you need to import into an existing database, consider using other methods like Data Migration Assistant (DMA) or Transactional Replication.
5. Importing a BACPAC File into Azure SQL Managed Instance
To import a BACPAC file into Azure SQL Managed Instance:
- Prepare the Azure Environment:
- Ensure you have an Azure SQL Managed Instance set up in the desired region.
- Create a Managed Instance in the Azure portal if not already available.
- Upload the BACPAC File:
- Upload the BACPAC file to an Azure Blob Storage container within the same region as your Managed Instance.
- Initiate the Import:
- In the Azure portal, navigate to your Managed Instance.
- Under Settings, select Import.
- Provide the necessary details:
- BACPAC File URL: The URL of the BACPAC file in Azure Blob Storage.
- Database Name: The name of the new database to be created.
- Authentication Details: Server admin login and password.
- Monitor the Import Process:
- The import process will create a new database in your Azure SQL Managed Instance. Monitor the progress through the Azure portal.
- Verify the Imported Database:
- Once the import is complete, connect to the new database using SSMS or Azure Data Studio to verify its integrity and functionality.
Note: Similar to Azure SQL Database, the import process creates a new database. For importing into an existing database, consider using other methods.
6. Best Practices for Using BACPAC Files
- Transactional Consistency: BACPAC files do not guarantee transactional consistency. To ensure consistency, perform the export during a maintenance window or when the database is not under heavy load.
- Database Size: The maximum size for a BACPAC file is 200 GB. For larger databases, consider using other migration methods.
- Performance Optimization: Ensure the source server has adequate resources (CPU, memory, disk I/O) to handle the export process efficiently.
- Data Integrity: After import, verify the integrity of the database by checking data consistency and application functionality.
7. Limitations of BACPAC Files
- No Transaction Logs: BACPAC files do not include transaction logs, which means point-in-time recovery is not possible.
- No Cross-Database References: BACPAC files do not support cross-database references, which can cause issues if your